
SSH
It’s actually quite easy!
SSH is a very common encrypted and authenticated transport protocol from a client to a server.
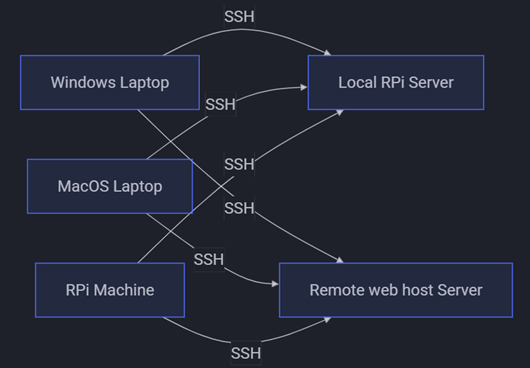
In a homelab, the client might be a Windows or MacOS laptop, or a Raspberry Pi machine. The server might be a Raspberry Pi machine being used as a home server, or a remote web host server.
SSH is often already setup on a server. If it’s not it’s generally easy to set it up.
You can see a log of SSH activity by using the following command on a server
$ journalctl -u ssh
If you’re on Windows, download and install Git, then you can run these commands using the  Git Bash command line utility that comes with a Git installation on Windows.
SSH URIs
A client connects to a server using an SSH URI such as
ssh://[user@]<server-hostname><some-path>
The square brackets [user@] indicate that part is optional. If the username on the client and the server are the same, this can be omitted. The <server-hostname> is the server’s domain name or IP address; it might be, for example, the name of a server in your home myHomelab.local, or it might be an external website like example.com:
ssh://ted@example.com/path/to/project.git
Here, the <some-path> part takes us from root on the server to a Git project.
You can also use an SCP-like syntax:
[user@]<server-hostname>:<some-path>
Note that <some-path> may or may not start with a / … you use it if the path is from root of the server, and omit it if the path is relative to the home directory of the user on the server. For example
ted@example.com:repos/project.git
and this
ted@example.com:/home/ted/repos/project.git
go to the same project.git on the server if the directory repos is in ted’s home directory /home/ted.
We can connect to a server’s terminal using the ssh command with an SSH URI on a client:
$ ssh [user@]<server-hostname>
SSH Keypairs
SSH works by using a keypair. The filenames of the two keypair files is often id_rsa and id_rsa.pub, but might be id_ed25519 and id_ed25519.pub.
The one with .pub is the public key, and it is given to the server. Teh one without .pub is the private key and should be kept securely on the client’s machine.
These keypair files are typically stored in a directory named .ssh in the user’s home directory. On a Linux machine this is probably ~/.ssh which is shorthand for /home/<user>/.ssh. On a Windows machine it is probably C:\Users\<user>\.ssh.
There might be two other files in this directory: authorized_keys and known_hosts.
So, your .ssh directory with have two text files named
id_rsa(orid_ed25519)id_rsa.pub(orid_ed25519.pub)
and might additionally have the text files
authorized_keysknown_hosts
Authorized Keys
This file is in the .ssh directory on a server. It contains the public keys of users on client machines. Each entry in this file looks something like:
ssh-ed25519 AAAATHISISAVERYLONGSTRINGHELLOTHEQUICKBROWNFOXJUMPEDOVERALOGTWENTYTIMES <user>@<client-hostname>
Note that this is all on one line; each user’s public key must be on one line without breaks.
Known Hosts
This file is in the .ssh directory on a client. SSH automatically stores the identity of servers in this file. There might be another file like this under /etc that serves the same purpose except for all users on
the machine.
Any given machine can be both a client and a server, and thus might have both files authorized_keys and
known_hosts in the .ssh directory. For example, one of my Raspberry Pi machines has both files because I SSH into it from my Windows laptop, and I also use it to SSH into the local git server and a remote server.
Create a Keypair
You can check for existing SSH keys with this command
$ ls ~/.ssh
If there are no keys, or even an .ssh directory, you can create them by running ssh-keygen:
$ ssh-keygen
It will show the following:
Generating public/private rsa key pair.
Enter file in which to save the key (/home/ted/.ssh/id_rsa):
Created directory '/home/ted/.ssh'.
Enter passphrase (empty for no passphrase):
Enter same passphrase again:
Your identification has been saved in /home/ted/.ssh/id_rsa.
Your public key has been saved in /home/ted/.ssh/id_rsa.pub.
The key fingerprint is:
a6:82:42:8e:d7:f1:cc:9b:31:53:96:89:49:da:9b:e3 ted@mylaptop.local
For Enter file in which to save the key... either hit enter to use the default,
or enter one, e.g. /home/<user>/.ssh/id_rsb. This could be useful if you already have a keypair put want to create another one.
For Enter passphrase... you can hit enter without typing anything to have no password.
Running ssh-keygen creates the files id_rsa, id_rsa.pub, and the ~/.ssh dir if it doesn’t exist.
Configure Server for a Client
You allow a client to SSH into a server by adding the client’s public key to the server’s authorized_keys file.
If the user that you wish to allow the client SSH access doesn’t areldy exist, you can create it using:
$ sudo adduser <user>
If not already logged in as this user, then you can switch to it:
$ su <user>
After entering the user’s password, navigate to that user’s home directory and check for a .ssh directory:
$ cd
$ ls -a
If it doesn’t already exist, you can make and configure one with:
$ mkdir .ssh
$ chmod 700 .ssh
If you just made a new .ssh directory, or if one already existed but did not already contain an authorized_keys file, you can create and configure one like this:
$ touch .ssh/authorized_keys
$ chmod 600 .ssh/authorized_keys
You will need some way to transfer the client’s public key to the server. We’re assuming a homelab setup, so you might be able to do this all on the client machine by simply using the clipboard to copy/paste the public key. For example, if the key on the client is in the file id_rsa.pub, then run
$ cat ~/.ssh/id_rsa.pub
and use your mouse to select and copy the key; copy everything between and including ssh-rsa to <user>@<hostname>, then you can paste this in the server if you can already access the server from the client using, e.g. a web browser to access the control panel of your web host server. If you can’t use the copy/paste method, then choose any other method.
On the server, create a temporary file to store the client’s public key:
$ touch ~/.ssh/tmp id_rsa[.id].pub
where [.id] is some string you use to identify this key from others (this is optional).
Then open that file
$ nano ~/.ssh/tmp id_rsa[.id].pub
and use your mouse to paste the client’s public key. Remember from authorized_keys, above, that it all must be on one line.
Then you can place the key at the end of the server’s authorized_keys file using:
$ cat ~/.ssh/tmp/id_rsa[.id].pub >> ~/.ssh/authorized_keys
Now the specified user on the client machine should be able to SSH into this user on the server.
Passwordless SSH
If you wish to avoid typing in the password for each SSH, you can setup password-less SSH!
On the client run
$ ssh-copy-id [user@]<server-hostname>
where [user@] and <server-hostname> are that of server.
Enter the server user’s password (for the last time … yay!).
Now you can run
$ ssh [user@]<server-hostname>
to access the server’s terminal without needing to give a password.
Outro
SSH is seen by many as almost a dark art, something they know can be done, but only by wizards who have some secret knowledge they don’t have. However, as you can see, there really isn’t much to know:
- URI: above we can see it’s not so complicated, is it?
- Keypair: Private stays on the client, Public is copied to server’s
authorized_keysfile
And that’s the gist of it.
To suggest an edit or correction to this page, please click the "Edit this page" button below or at the top to access the source file on GitHub.